Getting Started
Your personal menu is where you manage how you appear and how Scholis works for you. You open it by clicking your name or profile picture in the upper-right corner of any page (the minibar). From this one menu you can update your profile, control the notifications you receive, adjust your account settings, and preview your course the way a student sees it.
This guide covers four features found in that menu: Profile, Account Settings, Notifications, and View As.
Note: The options in your personal menu may vary slightly depending on your role and the permissions enabled by HGS. If an option described here is not available to you, contact the Help Desk.
Open Your Profile
- Click your name or profile picture in the upper-right corner of any page.
- Select Profile from the menu.
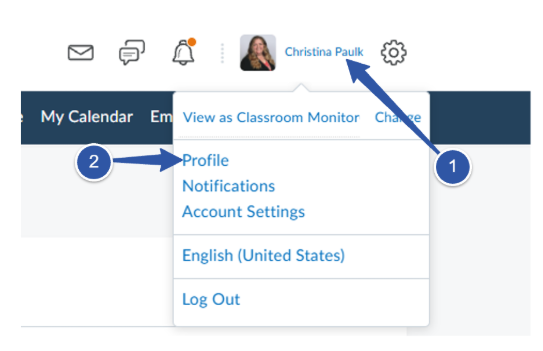
Edit Your Profile
On the Profile page, you can add or update information in fields such as:
- Picture – upload a professional headshot so students can put a face to your name.
- Tagline and personal quote – a short line that appears with your profile.
- Contact information, education, and interests – optional details you choose to share.
DO NOT complete any of the following as it will not appear to students:
After making changes, click Save and Close.
Tip: The picture you set here is separate from the “About Your Teacher” widget on your course homepage. See the About Your Teacher guide for setting up that widget in each course.
Account Settings
Account Settings control how Scholis looks and behaves for you (things like your time zone, date and time formats, and accessibility and display preferences). These settings apply to your account across all of your courses.
Open Account Settings
- Click your name or profile picture in the upper-right corner of any page.
- Select Account Settings from the menu.
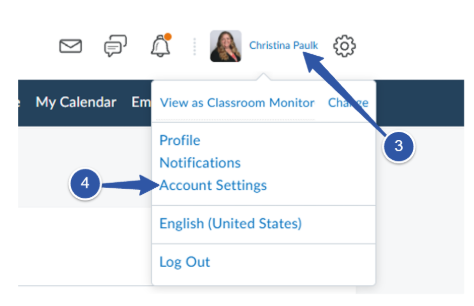
Common Settings to Review
A few settings are worth confirming when you first set up your account:
- Time Zone – make sure this matches your working time zone so due dates, calendar events, and timestamps display correctly.
- Font and Readability – adjust font size and settings if you'd like larger or higher-contrast text.
- Date and Time formats – choose how dates and times appear throughout Scholis.
- Signing in and dialog behavior – options such as how videos and dialogs behave.
After adjusting your preferences, click Save and Close.
DO NOT change our email address in the account settings:
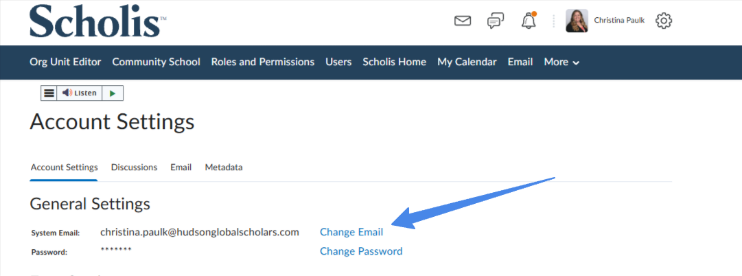
Note: A correct time zone is the single most important setting here—an incorrect time zone can make assignment due dates and calendar events appear at the wrong time.
Notifications
Notifications let you decide how and when Scholis tells you about activity in your courses such as new discussion posts, submitted assignments, or grade updates. You can receive notifications by email and, where enabled, by text (SMS).
Open Notifications
- Click your name or profile picture in the upper-right corner of any page.
- Select Notifications from the menu.
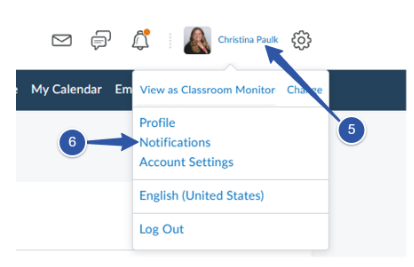
Set Your Contact Methods
At the top of the Notifications page, confirm how you want to be reached:
- Email – by default, notifications go to your HGS email. You can register a different email if your institution allows it.
- Mobile / SMS – if text notifications are enabled, register your mobile number to receive alerts by text.
- An assignment submission folder has a new submission.
- A new discussion post is made in a topic you're subscribed to.
- Grades are released or updated.
- A new announcement is posted.
Choose What You're Notified About
Under Instant Notifications, check the box for each activity you want to be told about, and choose whether it comes by email or SMS. Common examples include:
You can also set a Summary of Activity to receive a digest of course activity on a daily schedule instead of individual messages. When you're finished, click Save.
Tip: Turning on a submission notification for your assignments is a simple way to know when work is waiting in your Needs Grading list—without having to check the course repeatedly.
Note: You can exclude specific courses from your notifications using the “manage notifications for specific courses” option, which is helpful if one course is especially active.
View As (Preview Your Course)
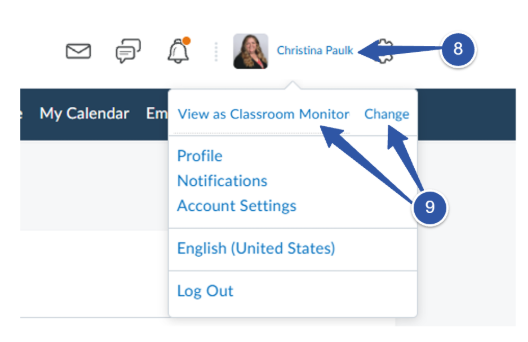
The View As option lets you preview your course from another role's perspective—most often as a student—so you can confirm what learners actually see. This is useful for checking that content is visible, dates are released, and activities appear the way you intended. In your personal menu this may appear as View as Designer with a Change link, which lets you switch the role you are previewing.
Preview as a Student or Classroom Monitor
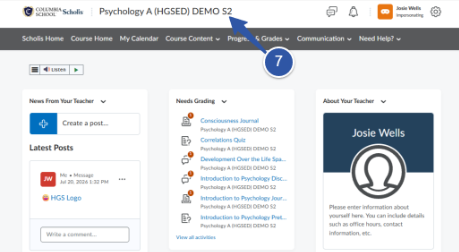
- To use this feature, you must open up a course and then select the User to View As.
- Click your name or profile picture in the upper-right corner.
- Select Classroom Monitor or click Change to select Learner (which is student view).
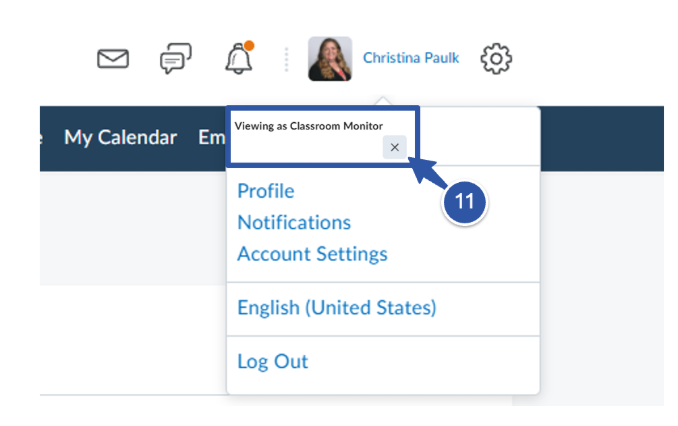
- Selecting either one will display the course as that role sees it. A banner indicates you are viewing as another role.
- When you're done, use the banner or return to your personal menu to switch back to your own view.
Important: View As changes what you see, not what students see. It's a preview tool—any navigating you do in this mode does not change student records or submit work on their behalf.
Tip: Preview as a student after you build or release new content, adjust availability dates, or set up an assignment—it's the quickest way to catch anything that didn't publish or is hidden from learners.
Quick Reference
All four features are reached the same way—by clicking your name or profile picture in the upper-right corner, then choosing from the menu:
|
Menu Option |
What It Does |
|
Profile |
Update your picture and the information other users can see about you. |
|
Account Settings |
Set your time zone, date/time formats, and display and readability preferences. |
|
Notifications |
Choose which course activity alerts you receive, and whether by email or text. |
|
View As / Change |
Preview your course as a student or other role to confirm what they see. |