Getting Started
Each Scholis course includes a set of pre-built Intelligent Agents that automatically send emails to students and parents based on specific course activity. Three agents come ready in every course: a welcome email, an inactivity alert, and a course-ending reminder. Before these agents can be used, you must personalize them for each course you teach.
Important: Intelligent Agent settings are course-specific. If you teach multiple courses, you must complete these steps in every course. Personalizing one course does not update the agents in your other courses.
Additionally, you will use specific intelligent agents for our DNC (do not contact) course sections to avoid sending out information to our students and their guardians.
Step 1: Open the Intelligent Agent List
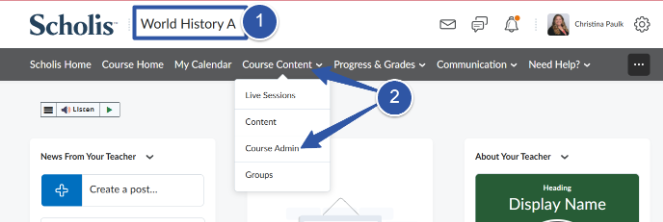
- Before opening the intelligent agent, review the course title for the DNC acronym. If one exists, then this course section, you can ONLY use the DNC intelligent agents.
- From your Course Home page, select Course Content and then Course Admin from the navigation bar.
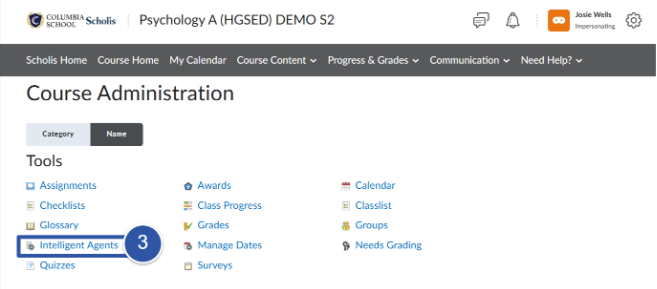
- Select Intelligent Agents from the list of available tools.
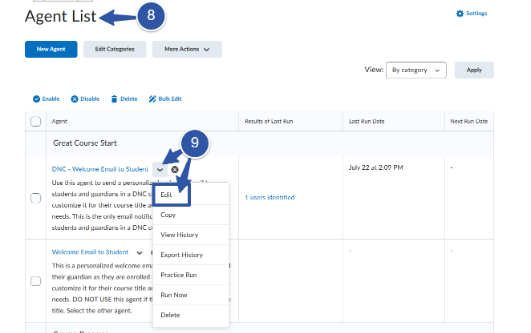
- You will see all of the Intelligent Agents that have already been created for your course.
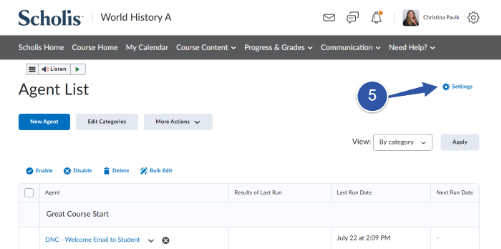
- On the Intelligent Agents page, select Setting.
- Under Custom Values, enter your Name and your Email Address.
- Select Save.
- Return to the Intelligent Agents list.
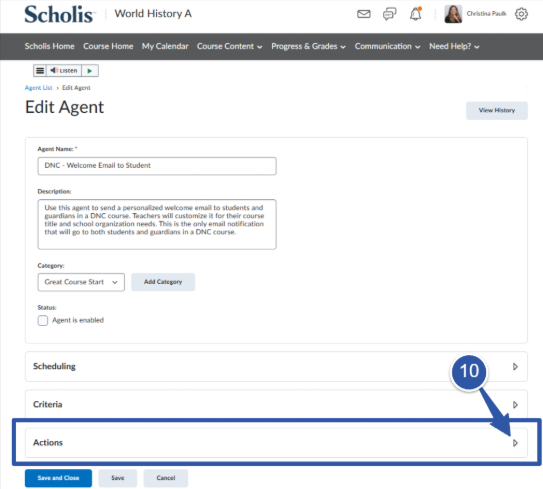
- Select the drop-down arrow next to an Intelligent Agent and choose Edit.
- Select the Actions tab.
- Scroll to the Message section.
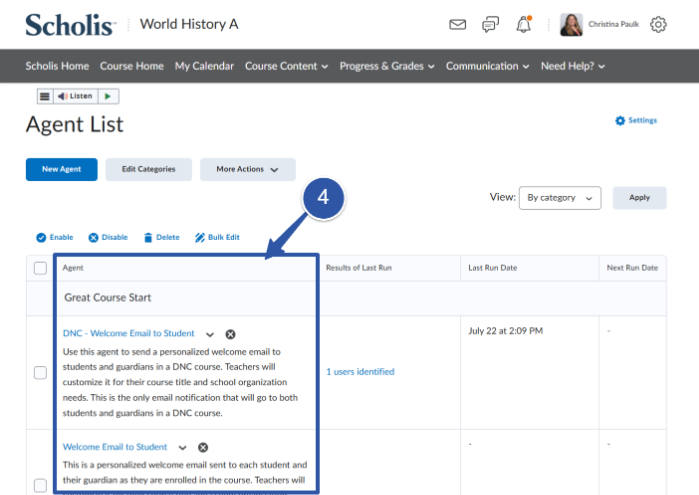
You can select the View dropdown menu to see these agents by category. There are three categories: Great Course Start, Course Progress, and Great Course Ending. Each category has one agent (or automatic message that will be sent with two variations. One is for DNC and the other is for all other courses).
Step 2: Update the Agent Settings (Complete Once Per Course)
Before editing any individual agents, update the course-specific settings so the agents can use your information when sending automated emails.
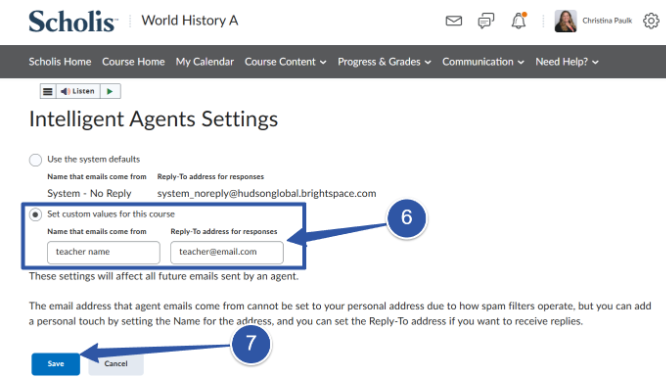
Note: These values allow the Intelligent Agents to send automated emails from your name and address, so students and parents recognize the message as coming from you. You must also confirm the sender / reply-to address in your course settings is set to your own email—see the separate guide on adjusting the agent email sender.
Step 3: Personalize Each Intelligent Agent
Each automated email should include your own personalized message and signature.
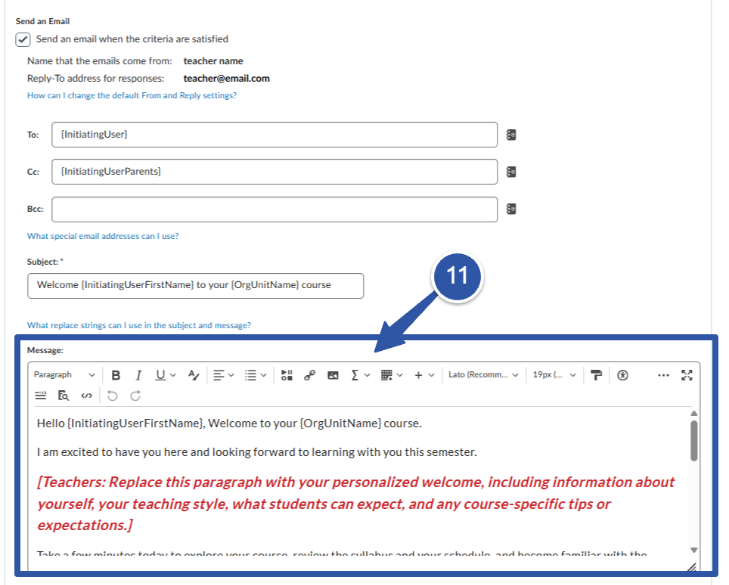
Update the message. Replace the existing section in RED with your own personalized message to students and parents. Your message should:
- Welcome or encourage the student, as appropriate for the agent.
- Match your own communication style while remaining professional.
- Support the purpose of the automated email.
- Agenta Name
- Description
- Category
- Scheduling
- Criteria
Add your signature. At the end of each message, include your own signature—your name and your teaching role or course subject, for example “Jane Smith, English Teacher” or “John Doe, U.S. History Teacher.”
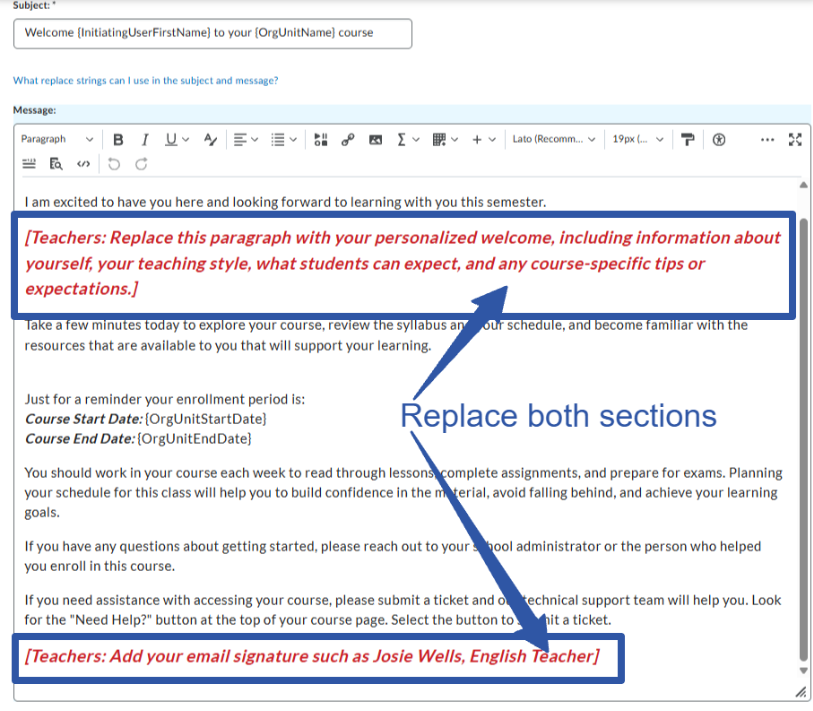
Important: Do not include organizational branding such as Hudson Global Scholars or other school brand names in your signature. Use only your name and your teaching role or course subject.
Note: Leave all replacement fields in curly brackets—such as {InitiatingUserFirstName} and {OrgUnitName} exactly as they are. These automatically fill in each student's information when the email is sent.
Step 4: Repeat for Every Intelligent Agent
Each Intelligent Agent contains its own message. Repeat Step 3 for every agent in the course until each email has been personalized with your message and signature.
DO NOT ADJUST the following:
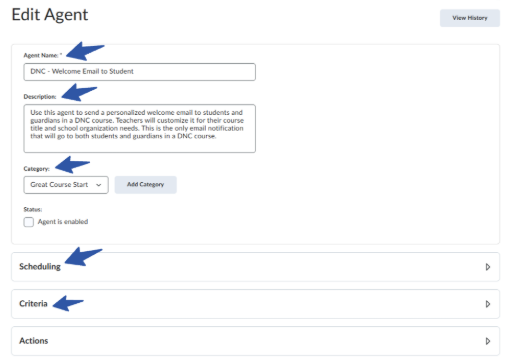
Remember: If your course has DNC in the course title, then you will only use the DNC intelligent agents. You will only need to customize those 3 agents.
Step 5: Enable the Intelligent Agent
After you have personalized the message and signature for an agent, you must enable it before it can begin sending automated emails.
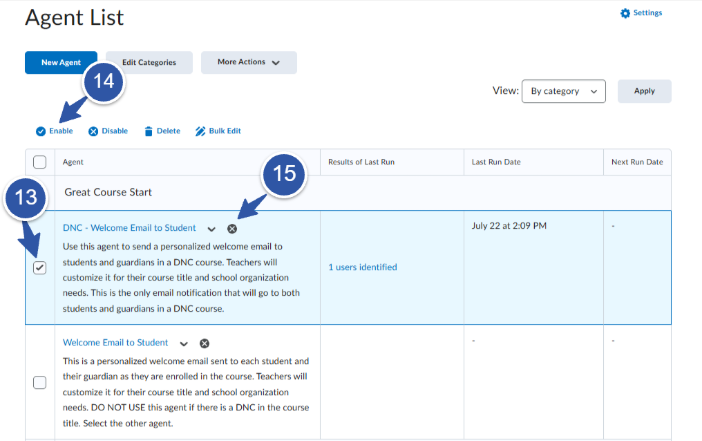
- Return to the Intelligent Agents list.
- Select the check box next to the Intelligent Agent you have finished customizing.
- Select Enable from the toolbar at the top of the page.
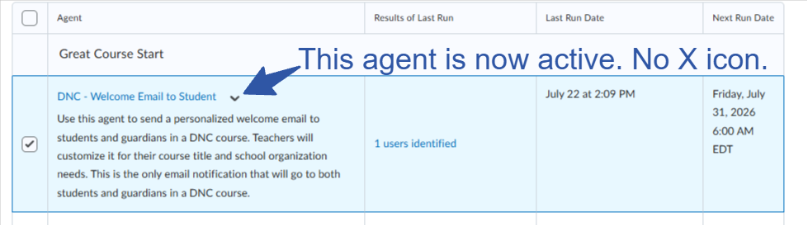
- Once enabled, the X icon next to the agent will disappear, indicating the agent is now active.
- Return to the Intelligent Agents list and select the agent's check box.
- Choose Disable.
- Edit the agent as needed.
- Save your changes, then Enable the agent again.
Tip: Complete the personalization steps before enabling an agent. This ensures students and parents receive your customized message rather than the default text.
Only enable the agents you need for you course taking note of the DNC agents and use ONLY if your course title has a DNC in the title.
Need to Make Changes?
If you discover an error after enabling an Intelligent Agent:
Disabling an agent temporarily prevents it from sending automated emails while you make updates.
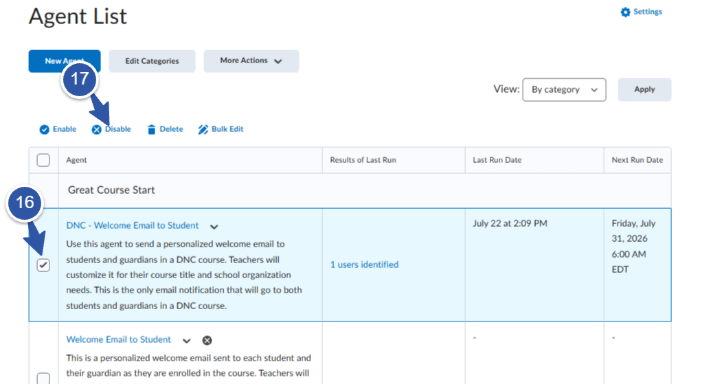
Important: Do not delete Intelligent Agents. These agents have been preconfigured for your course and are part of the standard course setup.
Important: Do not use the Bulk Edit option. Each agent should be customized individually by updating only your name, your email address, your personalized message, your signature, and the agent's enabled status.
Best Practice: After personalizing, verify that each agent you intend to use is enabled. A missing X icon indicates the agent is active and ready to send communications when its conditions are met.
The Three Intelligent Agents in Your Course
The reference below describes each pre-built agent—its purpose, when it runs, and the message template to personalize. As you work through Step 3 for each agent, use these details to guide your edits.
Agent 1: Welcome Email to Student
Goal: Send a personalized welcome email to each student and their guardian as they are enrolled in the course.
|
Setting |
Value |
|
Agent Name |
Welcome Email to Student |
|
Category |
Great Course Start |
|
Scheduling |
Repeat weekly — runs Mondays at 6:00 AM ET |
|
Criteria |
Role in Class: Learner |
|
Action frequency |
Take action only the first time the criteria are satisfied for a user |
|
To |
{InitiatingUser} |
|
CC |
{InitiatingUserParents} |
|
Subject |
Welcome {InitiatingUserFirstName} to your {OrgUnitName} course |
Note: The classroom monitor and site coordinator addresses must be entered manually for this agent in each course if requested by the school administration. Teachers will be notified on this request.
Message template. Replace the section in RED your own personalized welcome, and add your email signature at the end.
DO NOT EDIT the items in the curly brackets. {...} These are built to pull in the student’s name and course information.
Hello {InitiatingUserFirstName},
Welcome to your {OrgUnitName} course. I am excited to have you here and looking forward to learning with you this semester.
[Teachers: Replace this paragraph with your personalized welcome, including information about yourself, your teaching style, what students can expect, and any course-specific tips or expectations.]
Take a few minutes today to explore your course, review the syllabus and your schedule, and become familiar with the resources that are available to support your learning.
Just a reminder, your enrollment period is:
- Course Start Date: {OrgUnitStartDate}
- Course End Date: {OrgUnitEndDate}
- This was your Last Login Date: {LastCourseAccessDate}
- It is important to know your Course End Date: {OrgUnitEndDate}
You should work in your course each week to read through lessons, complete assignments, and prepare for exams. Planning your schedule for this class will help you build confidence in the material, avoid falling behind, and achieve our learning goals.
I am here to help you all along the way. If you have any questions about getting started, please reply to this email so that I can help you.
If you need assistance with accessing your course, please submit a ticket and our technical support team will help you.
[Teachers: Add your email signature such as Josie Wells, English Teacher]
Note: This intelligent agent runs only once. It is important to have this intelligent agent set up the same day that you are notified that you were assigned this course section. This ensures that students receive your welcome email during their first week.
Agent 2: Re-engage Inactive Learners
Goal: Notify the student and their guardians each time a student has not accessed their course in the last 7 days.
|
Setting |
Value |
|
Agent Name |
Not accessed course for 7 days |
|
Category |
Course Progress |
|
Scheduling |
Repeat weekly on Mondays at 6:00 AM ET |
|
Criteria |
Role in Class: Learner; Course Activity: user has not accessed course for at least 7 days |
|
Action frequency |
Take action every time the agent is evaluated and the criteria are satisfied for a user |
|
To |
{InitiatingUser} |
|
CC |
{InitiatingUserParents} |
|
Subject |
Login Alert for {InitiatingUserFirstName} in {OrgUnitName} |
Note: The classroom monitor and site coordinator addresses must be entered manually for this agent in each course if requested by the school administration. Teachers will be notified on this request.
Message template. Replace the section in RED by adding any course-specific personalization and your email signature.
DO NOT EDIT the items in the curly brackets. {...} These are built to pull in the student’s name and course information.
Hello {InitiatingUserFirstName},
This is a reminder that your course is active and you have not accessed {OrgUnitName} in the last 7 days. It is important that you work consistently in your course to complete all assignments.
[Teachers: Add course specific information as needed or delete this bracket.]
If you have any questions about your course material, please reply to this email so that I can help you.
If you need assistance with accessing your course, please submit a ticket and our technical support team will help you. Look for the "Need Help?" button at the top of your course page. Select the button to submit a ticket.
[Teachers: Add your email signature such as Josie Wells, English Teacher]
Agent 3: Course End Date Reminder
Goal: Notify the student and their parents that a student's course will be ending soon, so the student can focus on finishing strong.
|
Setting |
Value |
|
Agent Name |
Course End Date Reminder |
|
Category |
Great Course Ends |
|
Scheduling |
Repeat monthly, to capture learners approaching their end date |
|
Criteria |
Role in Class: Learner; Course Activity (enrollment-based — see note below) |
|
Action frequency |
Take action every time the agent is evaluated and the criteria are satisfied for a user |
|
To |
{InitiatingUser} |
|
CC |
{InitiatingUserParents} |
|
Subject |
{OrgUnitName} is ending soon for {InitiatingUserFirstName} |
Note on Timing: This notification will sent out 90 days after the course start date to the students and their parents. If a different time needs to be used based on the enrollment length of the course, please submit a helpdesk ticket.
Note: The classroom monitor and site coordinator addresses must be entered manually for this agent in each course if requested by the school administration. Teachers will be notified on this request.
Message template. Replace the section in RED your own personalized message, and add your email signature.
DO NOT EDIT the items in the curly brackets. {...} These are built to pull in the student’s name and course information.
Hello {InitiatingUserFirstName},
This is a friendly reminder that your course will end on {OrgUnitEndDate}. Now is a great time to review your remaining assignments, make sure you're on pace to complete all required coursework, and begin preparing for your final exam and/or final project.
[Teachers: Replace this paragraph with a customized message specific to this course, and helpful suggestions to finish strong.]
If you have any questions or need assistance, please reply to this message. I am here to help you finish the course successfully!
If you need assistance with accessing your course, please submit a ticket and our technical support team will help you. Look for the "Need Help?" button at the top of your course page. Select the button to submit a ticket.
[Teachers: Add your email signature such as Josie Wells, English Teacher]