Getting Started
When you evaluate an assignment, you can give feedback as a recording instead of, or in addition to, written comments. Recording a short audio or video message lets you explain your thinking, add a personal and encouraging tone, and point out things that are hard to capture in text alone. Students can listen to or watch your feedback in Scholis, and they can also download it.
This guide shows you how to record audio, record video, or upload an existing media file as feedback within the assignment evaluation screen.
Tip: Audio and video feedback is especially effective for encouragement, walking a student through a revision, or explaining a rubric score in a warmer, more human way than written notes.
Step 1: Open the Assignment for Evaluation
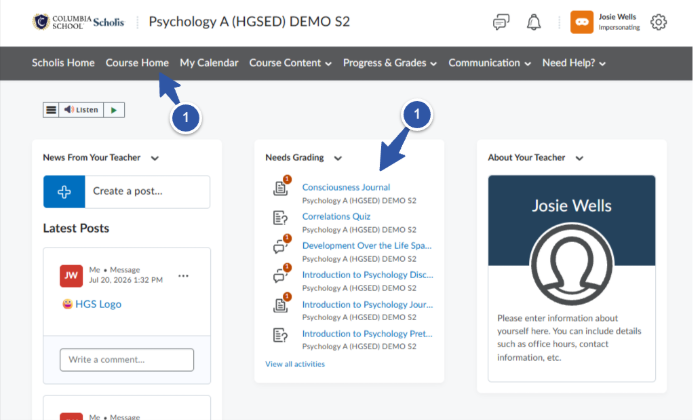
- From the course home, select the assignment from your Needs Grading list.
- Click a student's submission to open the Evaluation screen.
The student's work appears on the left, and the evaluation panel—where you add grades and feedback—appears on the right.
Step 2: Locate the Feedback Tools
In the Overall Feedback area of the evaluation panel, look at the toolbar above the text box. Alongside the text formatting options, you will see two icons:
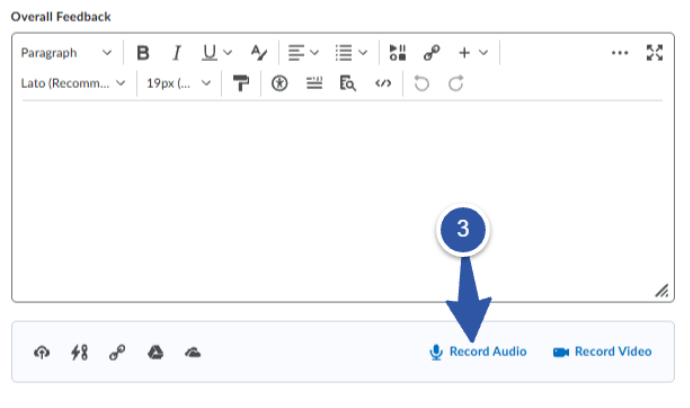
- A microphone icon – to record or add audio feedback.
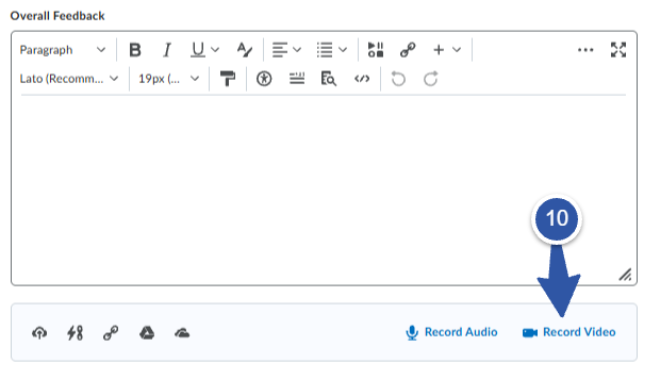
- A camera icon – to record or add video feedback.
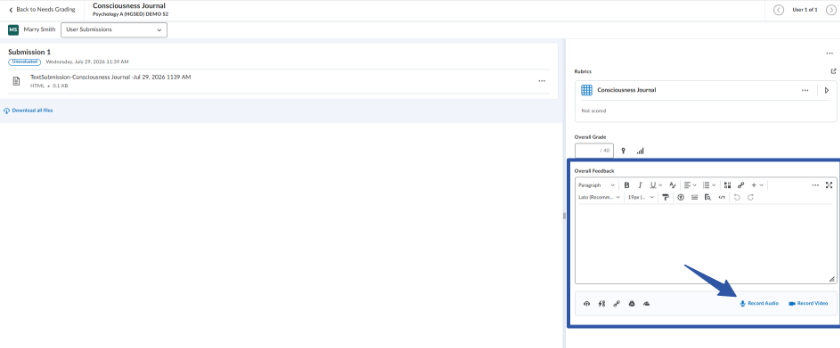
Note: If you don't see these icons, they may be tucked behind the “Insert Stuff” or expand (…) option in the toolbar, or the feature may need to be enabled. Contact the Help Desk if the recording tools are not available on your assignments.
Step 3: Record Audio Feedback
- Click the microphone icon in the feedback toolbar.
- In the recording window, click Record and begin speaking. You can record for up to one minute directly in Scholis.
- Click Stop when you're finished, then use Play to review your recording.
- If you'd like to try again, click Clear (or re-record) and start over.
- Add a title and, optionally, a short description.
- If you'd like captions generated, select the audio language.
- Click Add to attach the recording, then click Update to save it to the evaluation.
- Click the camera icon in the feedback toolbar.
- Allow Scholis to access your camera and microphone if your browser prompts you.
- Click Record, deliver your message, then click Stop when finished.
- Use Play to review, or re-record if needed.
- Add a title and optional description, and select the audio language if you want captions generated.
- Click Add, then click Update to save it to the evaluation.
- Click the microphone icon (for audio) or the camera icon (for video) in the feedback toolbar.
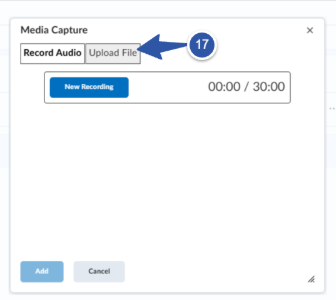
- In the window, choose Upload File instead of Record.
- Select the file from your computer. You can upload a file up to 1 GB.
- Add a title and optional description, and select the audio language for captions if desired.
- Click Add, then click Update to save it to the evaluation.
Tip: Before recording, jot down one or two points you want to make. A focused 30–60 second message is often more useful to a student than a long, unscripted one.
Step 4: Record Video Feedback
Note: Look into your camera and speak clearly. A brief, friendly video—“Hi Jordan, great work on your thesis, let's talk about your evidence”—goes a long way toward making feedback feel personal.
Step 5: Upload an Existing Audio or Video File
If you've already recorded a longer message or prepared a file outside of Scholis, you can upload it instead of recording live.
Step 6: Publish or Save Your Feedback
Your recording is attached to the student's evaluation, but the student won't see it until you release it.
- Click Publish to make the grade and feedback—including your recording—immediately visible to the student.
- Click Save Draft to hold your evaluation so you can release feedback to all students at the same time later.
Important: Recordings are added to the Overall Feedback, so they publish along with the rest of the evaluation. Remember to click Publish (or Publish Feedback for the whole assignment) when you're ready for students to see them.
Quick Reference
|
Feature |
Details |
|
Where to find it |
The microphone and camera icons in the Overall Feedback toolbar on the assignment Evaluation screen. |
|
Record length (in Scholis) |
Up to 1 minute for audio or video recorded directly in the tool. |
|
Upload size limit |
Up to 1 GB for a file recorded or prepared outside Scholis. |
|
Captions |
Select the audio language when adding the file to generate captions. |
|
Student access |
Students can play the recording in Scholis and can also download it. |
|
When students see it |
After you Publish the evaluation (or Publish Feedback for the assignment). |
|
Recording Background |
Be sure that you have a professional and uncluttered background when creating a video recording. |
Troubleshooting
|
Issue |
What to Check |
|
No microphone or camera icon |
The tools may be behind the Insert Stuff or (…) menu, or not enabled. Contact the Help Desk. |
|
Browser won't record |
Confirm your browser has permission to use your microphone and camera, then reload the page. |
|
File won't upload |
Check that the file is under 1 GB and is a standard audio or video format. |
|
Student says they can't hear it |
Confirm you clicked Update after adding the recording, and that you Published the evaluation. |